Vue를 사용하기 위해서는 VsCode 확장 패키지를 설치하여야 한다.
먼저 개발자 폰트 부터 설정하자.
코딩을 위한 개발자 폰트 설정
네이버 github.com/naver/d2codingfont
GitHub - naver/d2codingfont: D2 Coding 글꼴
D2 Coding 글꼴. Contribute to naver/d2codingfont development by creating an account on GitHub.
github.com
개발자 폰트를 다운 받아서 모든 사용자용으로 설치 한다.
vscode를 열어서
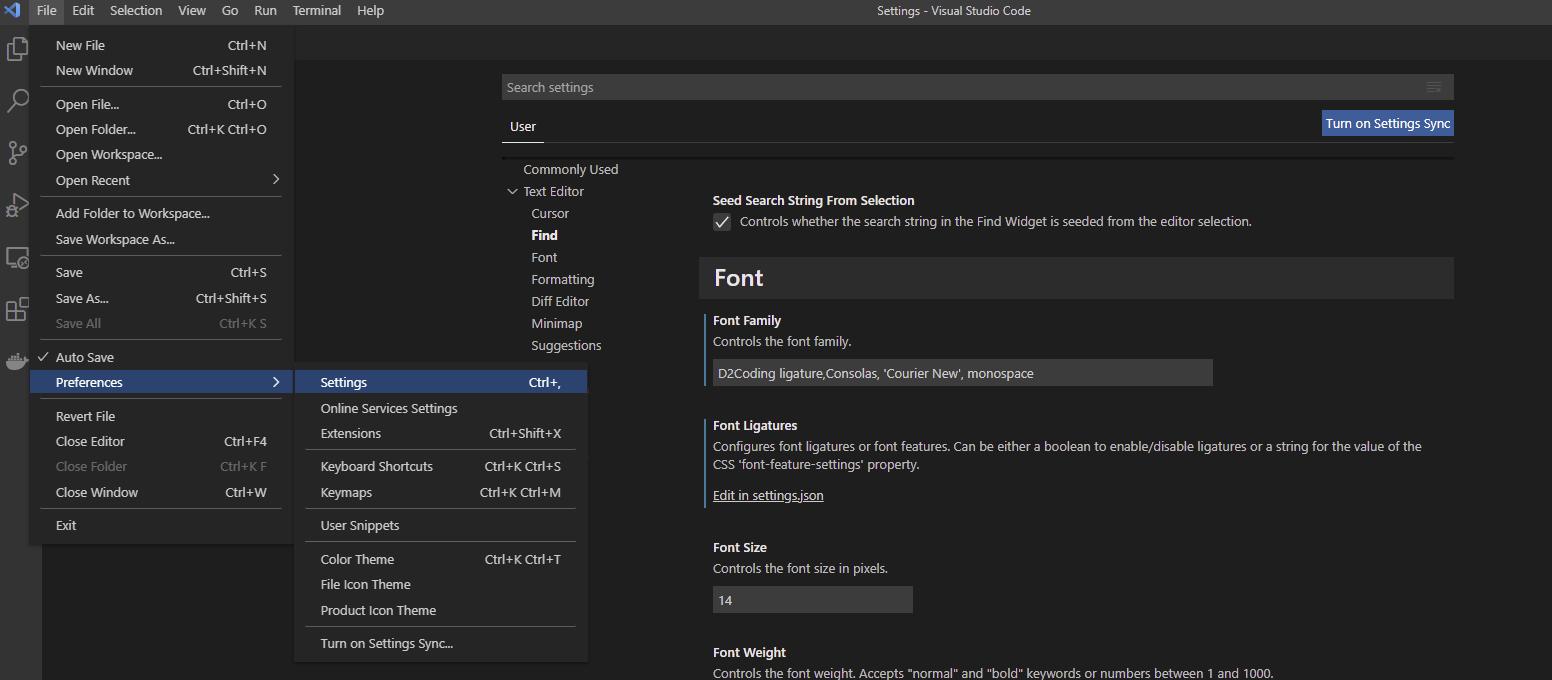
TextEditor -> Font
D2Coding ligature 입력합니다.
그리고 나서 Edit in settings.json 클릭하여
"editor.fontFamily": "D2Coding ligature,Consolas, 'Courier New', monospace",
"editor.fontLigatures": true,
이부분을 추가 또는 수정하면 적용 됩니다.
설정한 settings.json 파일 내용입니다. 파이션까지 설정된 포맷입니다.
{
    "git.autofetch": true,
    "git.enableSmartCommit": true,
    "python.languageServer": "Pylance",
    "explorer.confirmDelete": false,
    "git.confirmSync": false,
    "editor.codeActionsOnSave": {
        "source.fixAll": true
    },
    "files.autoSave": "onFocusChange",
    "workbench.iconTheme": "material-icon-theme",
    "workbench.editorAssociations": {
        "*.ipynb": "jupyter-notebook"
    },
    "editor.fontFamily": "D2Coding ligature,Consolas, 'Courier New', monospace",
    "editor.fontLigatures": true,
    "editor.minimap.enabled": false,
    "editor.tabSize": 2,
    "[python]": {
        "editor.wordBasedSuggestions": false
    },
    "javascript.format.insertSpaceBeforeFunctionParenthesis": true,
    "javascript.format.placeOpenBraceOnNewLineForControlBlocks": false,
    "javascript.format.placeOpenBraceOnNewLineForFunctions": false,
    "typescript.format.insertSpaceBeforeFunctionParenthesis": true,
    "typescript.format.placeOpenBraceOnNewLineForControlBlocks": false,
    "typescript.format.placeOpenBraceOnNewLineForFunctions": false,
    "editor.formatOnPaste": true,
    "editor.formatOnSave": true,
    "vetur.format.defaultFormatter.html": "prettyhtml",
    "vetur.format.defaultFormatter.js": "prettier-eslint",
    "editor.suggestSelection": "first",
    "vsintellicode.modify.editor.suggestSelection": "automaticallyOverrodeDefaultValue",
    "java.home": "c:\\openjdk-16.0.1_windows-x64_bin\\jdk-16.0.1",
    "files.exclude": {
        "**/.classpath": true,
        "**/.project": true,
        "**/.settings": true,
        "**/.factorypath": true
    },
    "liveServer.settings.donotShowInfoMsg": true,
    "workbench.startupEditor": "none",
    "[typescript]": {
        "editor.formatOnPaste": true,
        "editor.formatOnSave": true,
        "editor.defaultFormatter": "esbenp.prettier-vscode"
    },
    "notebook.cellToolbarLocation": {
        "default": "right",
        "jupyter-notebook": "left"
    },
    "auto-close-tag.excludedTags": [

        "area",
        "base",
        "br",
        "col",
        "command",
        "embed",
        "hr",
        "img",
        "input",
        "keygen",
        "link",
        "meta",
        "param",
        "source",
        "track",
        "wbr"
    ]
}
기본 글꼴을 설정후에 왼쪽에 Extensions 클릭하여 vue를 편하게 사용하기 위한 확장팩을 설치 하여 줍니다.

1. Auto Close Tag
2. Auto Rename Tag
3. Color Highlight
4. ESLint
5. Prettier - Code formatter
6. Vetur
7. Vue3 Snippets
8. Vue Development Extensions Pack
9. Vue Peek
10. Vue Snippets(vue-ls)
11. Vue TypeScript Snippets
12. Vue VSCode Snippets
13. vue-beautify
14. Vue.js AutoImport
15. vuevelocidad
설치 안해도 되지만 개발을 편리하게 하기 위해서 설치 하여 주는것이 좋다.
'프로그램 > Vue' 카테고리의 다른 글
| material 아이콘 url (0) | 2021.10.14 |
|---|---|
| vue를 이용한 프로젝트 생성 (0) | 2021.09.02 |
| vue 개발환경 설정하기 (0) | 2021.09.02 |
| store 저장소 처리 (0) | 2021.09.01 |
| router 설정 (0) | 2021.09.01 |


댓글